Setting up a Network Bridge with a Mini PC from AliExpress
I'm working on figuring out what's next for my homelab setup, and since I had vacation this past week, I decided to go for the first piece: a router PC.
Not a router as in a sealed piece of hardware, but a "router PC." You may have seen these floating around on sites like AliExpress, or from slightly more expensive but arguably better quality vendors like Beelink. It's just a small formfactor computer whose front is dominated by network ports. I chose this route because they are similarly priced compared to a decent router, but offer significantly more flexibility and the ability to run other services.
The box
I ended up getting the Topton X2G. Here are the salient specs:
- 4x 2.5Gbps Intel I226-V ethernet interfaces
- Celeron 7305 (5 cores; 4 efficiency and 1 performance) @ ~1.1Ghz max speed
- 8GB of DDR4 RAM (unknown manufacturer; couldn't get anything specific; manufacturer was
0x0080perdmidecode) - 128GB NVMe drive from ShiJi (Chinese manufacturer? I've never heard of it...)
Did I really need 8GB of RAM? No, but it was only like $15 extra, so why not?
Delivery to my home in South Korea was fairly fast by AliExpress standards; less than a week. It came with an AC adapter, and a region-appropriate plug (they automatically ship one based on your address, but I assume if you wanted one for a different region, you could ask. It's one of those standard ones you'd see with, say, an Intel NUC.)
Note that if you live in a country (like South Korea) which imposes tariffs on imported electronics, AliExpress doesn't handle this for you. In my case, I got a KakaoTalk message from their customs clearance partner, which was HILARIOUSLY named 비에스관세법인 (which translates to "BS Customs/Tariff Corporation"). Aside from the name being a fantastic description of tariffs, the stylized "BS" logo looks like a 1990s ISP. Pure gold.
Setup
I wasn't sure to expect, since there is no manual and the product description is a bit sparse. But I was pleasantly surprised to find the unit came preloaded with pfSense. It was a few releases out of date, but they certainly could have done worse! I promptly set up vanilla FreeBSD 15.1-RELEASE for better flexibility and to keep in sync with upstream.
Enabling coretemp
The coretemp kernel module is required for the thermal testing (this is the kmod for Intel CPUs; check docs for others).
I added coretemp_load="YES" to /boot/loader.conf and rebooted.
Networking
So I said this was going to be a router... It will eventually be a router, but I haven't yet decided what the rest of my homelab will contain. Specifically, I don't actually have any other new gear/enclosures, haven't decide what I'll be using for the local high-speed interconnect (DAC? Fiber? 10G ethernet?), and so I haven't purchased a switch yet. But my immediate paint point was that some devices on my network (like my NUC) didn't have native IPv6 access. So, until I make those decisions, the box will function more like a switch with a few services rather than a full router.
Aside: I still haven't determined yet if it's possible to use a third-party router from my ISP, but it looks promising. The mediocre, fairly locked down router from LG U+ does enable devices to autoconfigure via SLAAC, and its own public IP is a v6 one. I'll hook this up later and investigate whether they are using DHCPv6-PD or similar to hand out subnets, and if so, what size.
But just enabling the rest of my Ethernet devices to get IPv6 and on the same broadcast domain is a win. Prior to this, I only had a single direct Ethernet connection, and a whack double-NAT setup for other devices in my office behind a much worse wireless AP that they had in full router mode, and I couldn't switch to bridge mode. This will eventually be discarded entirely for a proper AP, but I digress...
Here's the configuration I landed on, with comments:
# Create a bridge interface
sysrc cloned_interfaces="bridge0"

# Mark all the physical interfaces as up
sysrc ifconfig_igc0="up"
sysrc ifconfig_igc1="up"
sysrc ifconfig_igc2="up"
sysrc ifconfig_igc3="up"

# Configure the bridge with all 4 physical interfaces
sysrc ifconfig_bridge0="addm igc0 addm igc1 addm igc2 addm igc3 up"
# Set a static IPv4 (outside my DHCP range) for easy management of the box
sysrc ifconfig_bridge0_alias0="inet 192.168.219.42 netmask 255.255.255.0"
# Enable IPv6 automatic configuration
sysrc ifconfig_bridge0_ipv6="inet6 auto_linklocal accept_rtadv"

# Since we're using a static IPv4, we need to explicitly set the upstream router
sysrc defaultrouter="192.168.219.1"

# Bring up v6 faster by actively soliciting RAs
sysrc rtsold_enable=YES
sysrc rtsold_interfaces="bridge0"
Note
A previous version of this post included some `sysctl`` settings which are no longer necessary (and further wouldn't have persisted past a reboot). Thanks to @homelabista@mastodon.social for pointing out my mistake.
If you're reading through the PF config below carefully, you may notice that it appears to block transparently bridged traffic. The default config as of FreeBSD 14.0 exempts this sort of traffic from PF filtering.
To apply the changes, you can either reboot or apply live like so:
# Apply the network changes
service netif restart
service routing restart
service rtsold start
Finally, I set up PF with some basic protections for the box.
lan_bridge = "bridge0"
mgmt4 = "192.168.219.42"
trusted4 = "192.168.219.0/24"

# TCP RST on block
set block-policy return

# Pass all traffic on the loopback interface
set skip on lo

# Basic packet cleanup
scrub in on $lan_bridge all fragment reassemble

# Block inbound connections by default unless whitelisted
block in all

# Allow outbound connections
pass out keep state

# SSH on the LAN to the management interface
pass in on $lan_bridge inet proto tcp from $trusted4 to $mgmt4 port 22

# ICMP
pass in inet proto icmp all
pass in inet6 proto icmp6 all
Start it in the usual way.
sysrc pf_enable=YES
service pf start
And with that, I had a functioning bridge. Other devices plugged into it naturally autoconfigured their own IPv6 via SLAAC and v4 via DHCP from the upstream router. Huzzah!
Thermals
One of the biggest questions I had about such a design was the thermals, after being scarred by my Intel NUC, which is a disaster. This one is a fanless design, which means less maintenance. Also, you probably don't want to touch the case while it's running. While idling, the CPU temperature is around 40 degrees, and you can expect similar temperatures on the case.
None of my gear at home has an interface faster than 1Gbps, so I couldn't try loading 2.5Gbps, but running a consistent 1Gbps transfer from one interface to another only raised the temperature a few degrees.
To stress it a bit more, I ran a Rust compilation job:
cargo install datafusion-cli.
I was pretty surprised how effective the heatsink was to be honest!
I picked this crate because it's not exactly small (it has 460 transitive dependencies).
rustc saturated all cores, but the temperature didn't really move (as reported by btop).
I've included a screenshot below of the build from btop as it was near the end of the job.
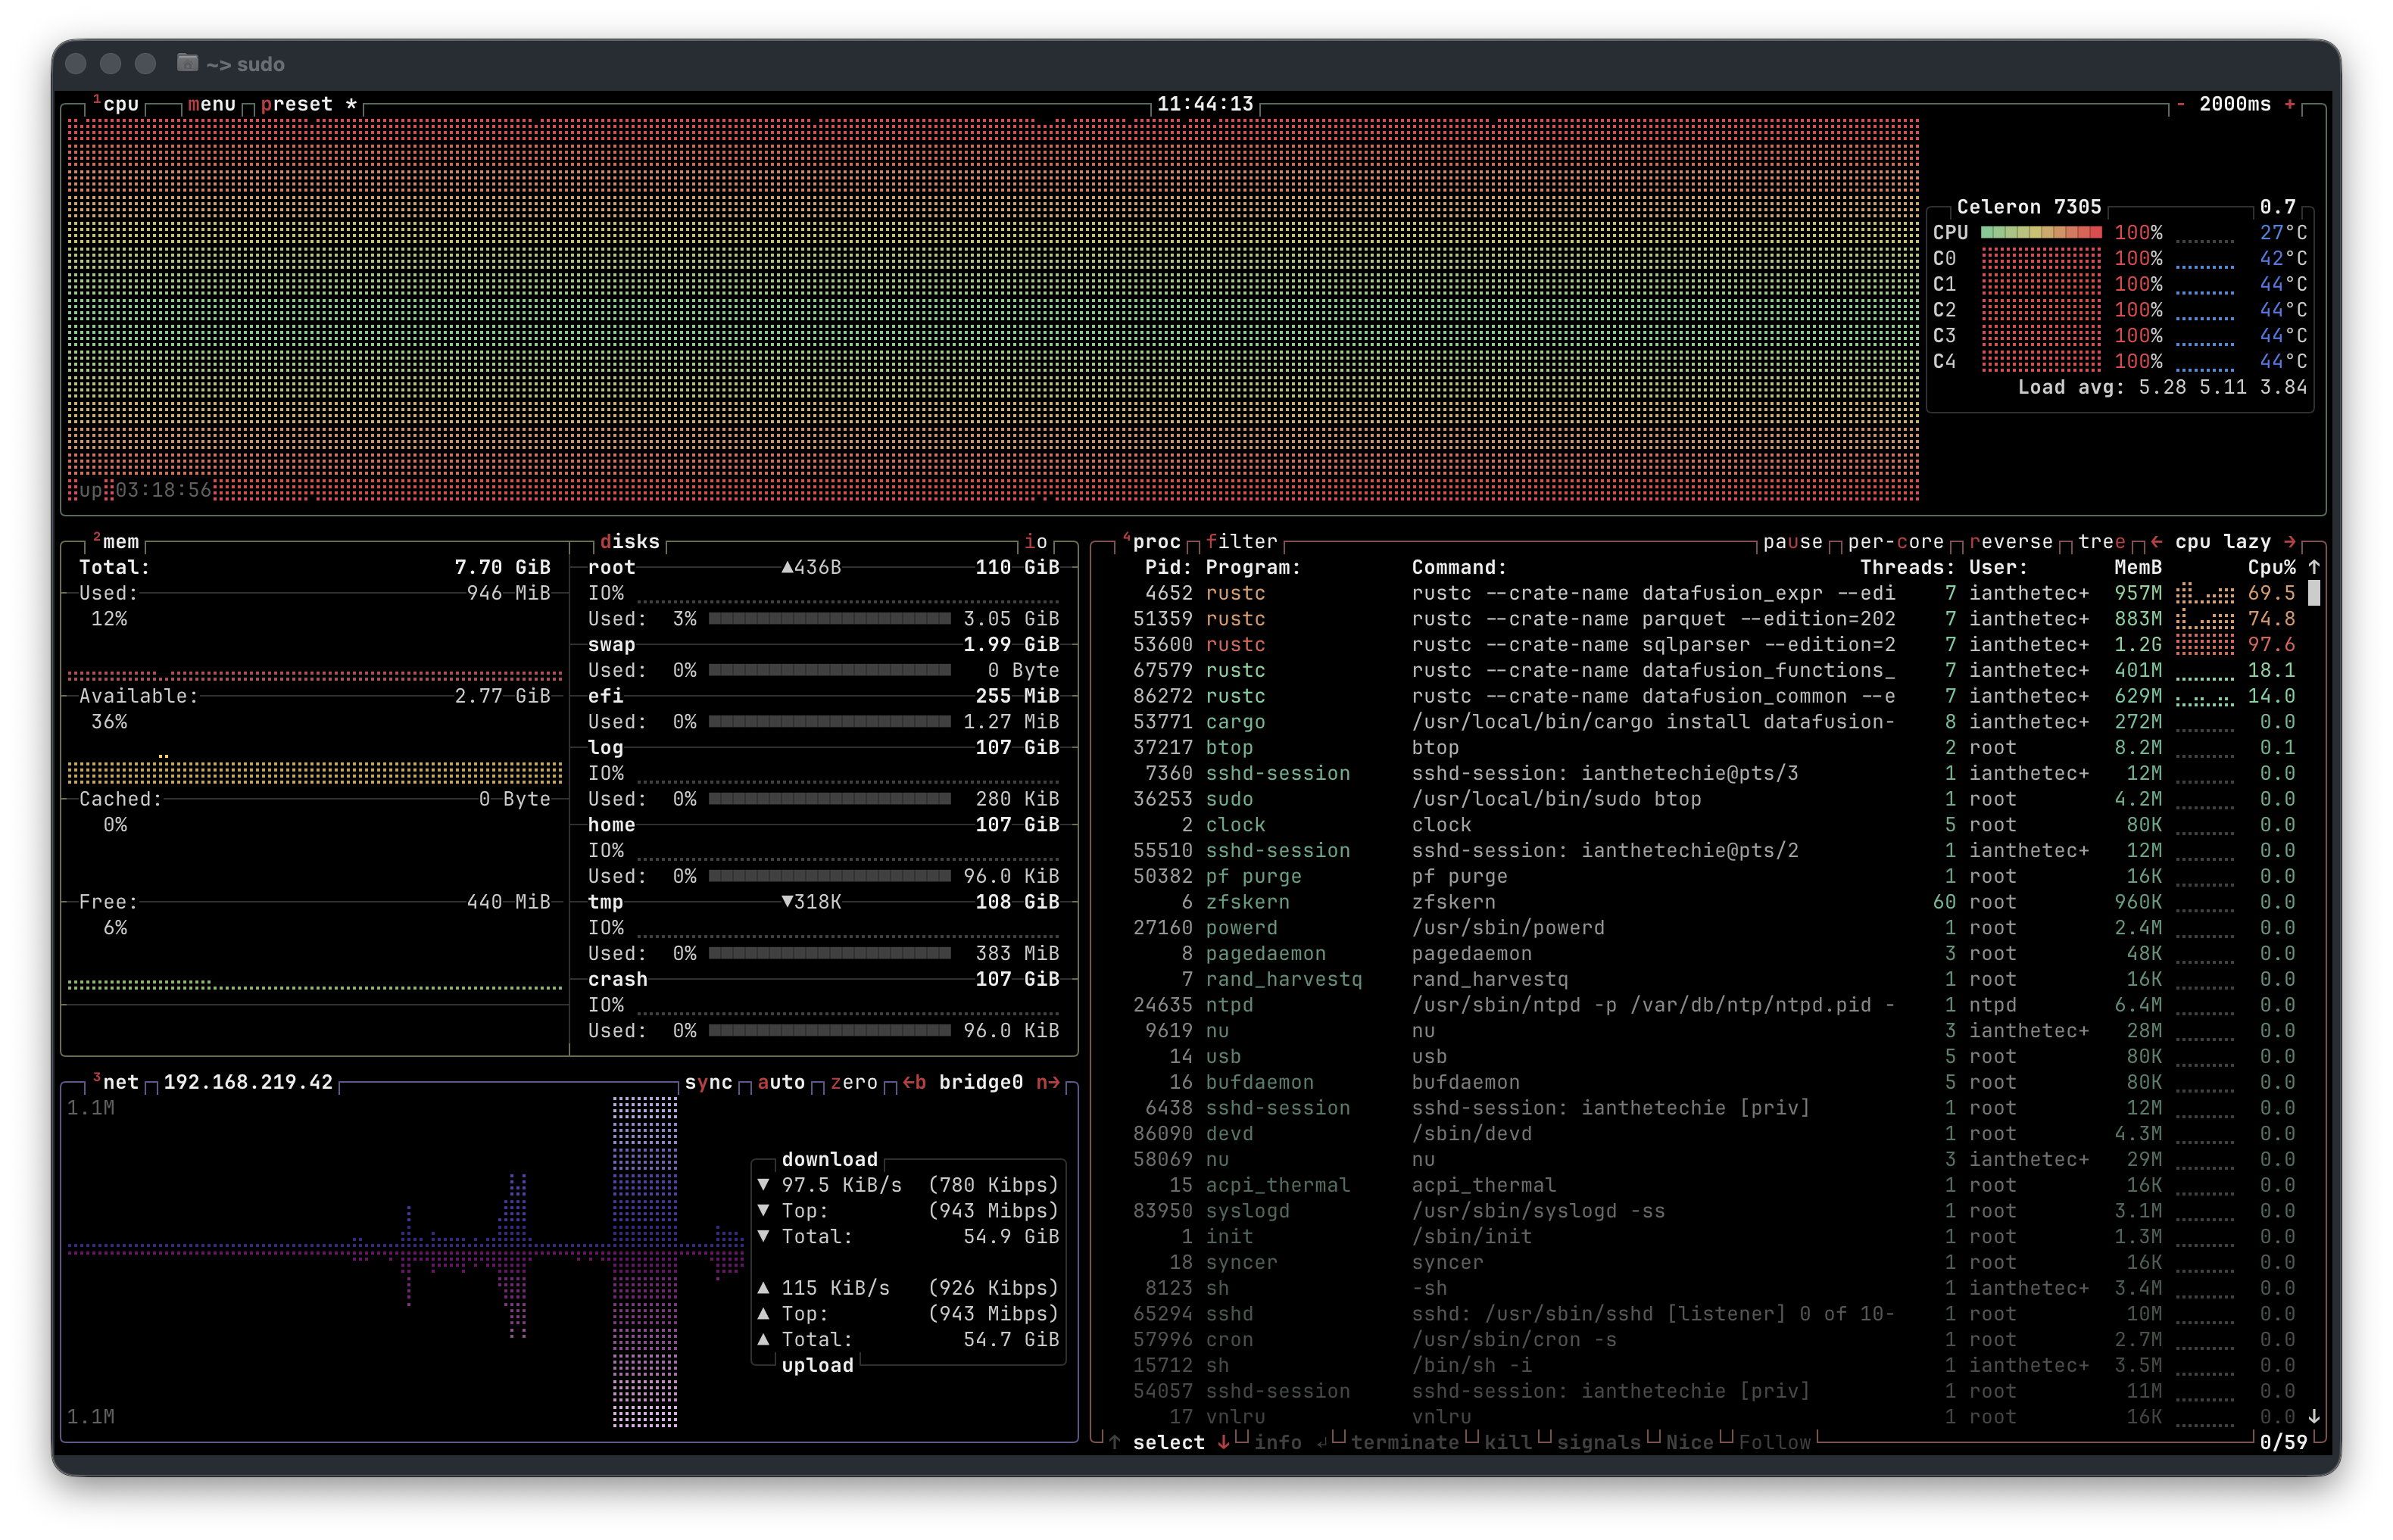
Fun facts:
- The temperature measured by
btopnever exceeded 46 degrees. Most of the time it was hovering around 44-45. - It seems to thermal throttle to keep the heat under control. You can see it running around 700MHz in the screenshot.
- The max heatsink temperature I measured during the build was 53 degrees.
The build took.... a very long time. It's not a speed demon, and of course this wasn't really designed to run heavy compilation workloads, but if you do need to compile something, you don't really need to worry about thermals, beyond remembering not to touch the hot stove ;)
Note that since there is no fan to actively draw the heat away, temperatures drop more slowly after a heavy operation than on an actively cooled system.
I also tested my network speed under full load. It was still happy to saturate my gigabit internet connection even at max load. Initiating new SSH connections was also instant. Just FreeBSD not skipping a beat!
Unexpected upside
One unexpected upside to all this is that I finally solved a mystery that had been bothering me. My Wireguard setup initially had really bad throughput, and I wasn't sure why at first. Long story short, it turns out that I had to reduce my MTU on the WG interface to 1392, because my ISP was tunneling all my v4 traffic over v6, reducing the effective MTU.
Getting native v6 enabled me to go direct without the v4-over-v6 tunneling, which let me safely raise the MTU. Yay!